अब कॉल करें &
Get a Quote
एक कहावत कहना

Want your DIY flooring project to look flawless and last long? The secret lies in preparation. From accurate measurements to subfloor repairs, each step is critical. Here's a quick overview of what you need to know:
Pro Tip: If your project involves structural issues, moisture concerns, or complex layouts, consider hiring a professional. Visit Elephant Floors in Sunnyvale for expert advice and free samples to ensure your project starts on the right foot.
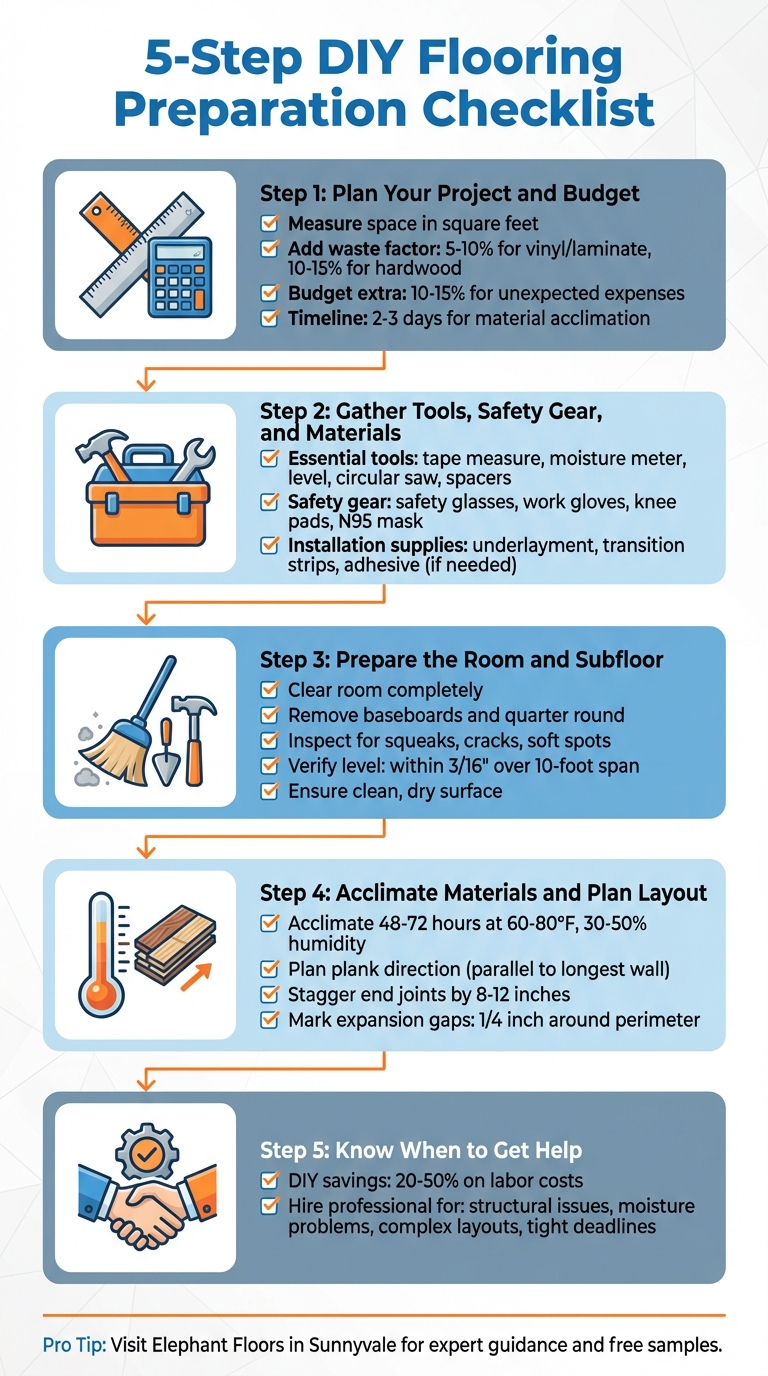
5-Step DIY Flooring Preparation Checklist for Sunnyvale Homeowners
Start by measuring each room in square feet. For rectangular spaces, multiply the length by the width. For irregularly shaped areas, break them into simpler shapes and measure each section separately. Don’t forget to include closets, hallways, and any small niches - they’ll need flooring too. To avoid running short, add a waste factor: 5–10% for vinyl or laminate and 10–15% for hardwood. This extra material accounts for cuts, mistakes, and future repairs.
Before buying anything, document the full scope of your project. Write down which rooms you’ll be covering, note any transitions (like where flooring meets tile or carpet), and decide if baseboards will be removed and reinstalled or if quarter round trim will be added. Also, check doorways to see if you’ll need reducers or thresholds. A detailed plan helps ensure accurate material orders and avoids unexpected issues mid-project.
Since many homes in Sunnyvale are built on concrete slabs, it’s important to consider moisture resistance when selecting flooring. Waterproof vinyl planks work well in kitchens, entryways, or any areas prone to moisture. For living and dining rooms, engineered hardwood offers a polished look and can handle minor moisture exposure. Laminate is a cost-effective option and great for DIYers, but spills should be cleaned up quickly to avoid damage.
Visit the Elephant Floors showroom in Sunnyvale to explore popular brands like Gaia Flooring, Vellichor, and Medieval Floors. You can request free samples to see how different options pair with your cabinetry and lighting. Their staff can also help you choose the right underlayment for your subfloor - whether it’s concrete or wood - and guide you through both budget-friendly and premium flooring options.
Calculate your total cost by multiplying the price per square foot of your chosen flooring by the total area (don’t forget to include the waste factor). Then, add in the costs of underlayment, transition strips, baseboards or quarter round, adhesives (if needed), and any disposal fees for old flooring. It’s smart to set aside an extra 10–15% for unexpected expenses or repairs.
Next, create a realistic timeline. Plan for 2–3 days to acclimate your flooring materials before installation begins. To keep things manageable, consider tackling one area at a time - start with bedrooms, then move to hallways or living spaces. Arrange temporary storage for furniture, such as in the garage or another room, and map out alternate routes through your home to minimize disruptions during the project. With your plan, budget, and timeline in place, you’re ready to gather your tools and start preparing your space.
The tools you’ll need depend on the type of flooring you’re installing. For click-lock laminate or vinyl planks, make sure you have a tape measure, carpenter’s square, utility knife (with extra blades), tapping block, pull bar, and ¼-inch spacers. Cutting planks to size will require a circular saw or miter saw. If you’re working with engineered hardwood, add a pneumatic flooring nailer, air compressor, and nail set to your toolkit. For glue-down vinyl, you’ll need an adhesive trowel with the correct notch size, a 100-lb. floor roller, and a straight edge for accurate cuts.
Preparation tools are just as important. A moisture meter is essential for testing concrete slabs, especially in areas like Sunnyvale, where slab foundations can trap moisture. Other must-haves include a 4-foot level to check for even surfaces, a chalk line for marking layouts, and a floor scraper to remove old adhesive or debris.
Once your tools are ready, it’s time to focus on safety.
Before starting, gather the necessary safety equipment: safety glasses, work gloves, knee pads, an N95 dust mask, and closed-toe shoes with a sturdy grip. A first aid kit is also a smart addition. If you’re working with adhesives, ensure the space is well-ventilated to avoid inhaling fumes.
You’ll also need installation supplies tailored to your flooring type. For example, foam underlayment works well for laminate, cork underlayment helps reduce noise, and a moisture barrier is critical for concrete slabs. Painter’s tape is handy for protecting baseboards, while a broom and shop vacuum will help with cleanup. Don’t forget transition strips or reducers for doorways. If adhesives are required, make sure to purchase the exact type recommended for your flooring; using the wrong adhesive could void your warranty.
Lastly, double-check that all tools and materials are compatible with your chosen flooring.
Before you begin, confirm that your tools and materials align with your flooring’s specifications. This step can save you from costly mistakes. For example, if you purchased your flooring from Elephant Floors, bring your product specs to confirm you have the correct underlayment, adhesive, and tools. Their team can help you avoid common errors, like using the wrong trowel notch for glue-down vinyl or forgetting a moisture barrier for a concrete subfloor. Need advice? You can call them at 222-5878 for help matching tools and materials with brands like Gaia Flooring, Vellichor, and Medieval Floors.
Start by clearing the room completely - move out all furniture, electronics, and any clutter. Bundle up cords to keep them out of the way and reduce tripping hazards. Carefully remove baseboards and quarter round to ensure clean edges for proper expansion gaps. If the trim is in good condition, you might be able to reuse it later.
To keep dust from sanding or scraping contained, seal off nearby rooms with plastic sheeting and painter's tape. Cover vents and doorways too. Make sure there’s a clear path from the entry door to your workspace so you can safely carry materials and tools in and out. If you’re removing old flooring, use a floor scraper to get rid of adhesive residue. Any bumps or sticky spots left behind can create issues with your new flooring down the road.
Once the area is prepped and secure, it’s time to inspect and repair the subfloor.
A solid subfloor is the foundation of a successful flooring installation. Check for squeaks, dips, or soft spots. If you have a wood subfloor, squeaks usually mean loose boards. Tighten them by driving screws through the subfloor into the joists below. Replace any sections that feel spongy or show signs of water damage - ignoring these issues can lead to problems with your new flooring.
For concrete slabs, look closely for cracks. Fill any cracks larger than 1/16 inch with a crack filler or patch compound. Grind down any high spots and use a self-leveling compound to fill in low areas or divots caused by aging or soil movement.
| Subfloor Type | Common Issues | Typical Repairs | Key Tools |
|---|---|---|---|
| Wood | Squeaks, loose boards, soft spots, dips | Secure boards with screws, replace damaged panels, sand or patch areas | Drill, screws, sander, floor patch |
| Concrete Slab | Cracks, divots, high/low spots, residual adhesive | Fill cracks, grind high spots, apply self-leveling compound | Concrete grinder, self-leveling compound, trowels, crack filler |
After completing repairs, ensure the subfloor is ready for installation.
Use a level to check the flatness of the subfloor across the room. For most floating floors, the subfloor needs to be within 3/16 inch of level over a 10-foot span. If it’s outside this range, your planks could flex, squeak, or develop gaps. On concrete slabs, use a moisture meter to check for dampness, as even Sunnyvale's mild climate can occasionally result in moisture issues.
Thoroughly sweep and vacuum the area to remove dust, debris, and loose particles - any leftover grit can interfere with adhesives or cause noise under floating floors. Maintain a stable environment by running your HVAC system and keeping the room at about 60–80°F with 30–50% relative humidity for several days before installation. This helps both the subfloor and flooring materials acclimate properly, following most manufacturer recommendations.
Before installing wood-based flooring, it’s crucial to let the materials adjust to your home’s environment. Keep the unopened boxes in the room where they’ll be installed, maintaining a temperature between 60–80°F and a relative humidity of 30–50% for 48–72 hours, or as directed by the manufacturer.
Each brand has its own acclimation requirements - brands like Gaia, Vellichor, and Medieval Floors may vary in their guidelines. Even if rigid-core vinyl planks claim "no acclimation needed", ensure the room is at normal living conditions before starting. For a more natural look, open a few boxes and mix planks from different cartons during installation to evenly distribute any slight color variations.
Once the materials are ready, shift your attention to planning a seamless layout.
For a polished and professional appearance, align the planks parallel to the longest wall or toward the main light source. This approach enhances the room’s sense of space. In hallways, laying planks lengthwise prevents a disjointed, ladder-like effect. If you’re working in an open-concept home, such as those in Sunnyvale, choose a direction - like from the front entrance to the living room - and maintain that flow across adjoining spaces.
To avoid surprises, dry-lay a few rows in the room’s center. This allows you to check that end joints are staggered by at least 8–12 inches between rows and identify potential layout issues early. Start along the straightest and most visible wall, snapping a chalk line to ensure your first row stays perfectly aligned. Don’t forget to plan for doorway transitions, marking areas for T-moldings, reducers, or thresholds, while leaving the necessary expansion gaps.
Roll out the underlayment perpendicular to the direction of the planks. Ensure the seams are tightly butted with no overlap, and use the manufacturer’s recommended tape to secure them and prevent shifting during installation. If the underlayment includes a vapor barrier, slightly overlap and seal the seams, especially when working over concrete slabs.
Leave an expansion gap of about 1/4 inch around walls, cabinets, and any fixed objects. Use spacers to maintain this gap along the perimeter. For larger rooms, check the product’s guidelines for maximum continuous length and add hidden expansion joints if necessary. To accommodate planks under door jambs and casings, undercut them with a handsaw, using a scrap plank as a guide. Later, baseboards or quarter-round trim can cover the gap while still allowing for natural expansion and contraction.
Once you've planned your project, you can save money by balancing DIY efforts with strategic spending. Here are some practical tips:
By taking on some of the work yourself, you could save 20–50% on your project costs, as labor often accounts for 30–60% of the total expense. However, keep in mind that these savings depend on proper preparation and installation. Mistakes might cancel out the benefits of going DIY.
When the complexity of the job outweighs potential savings, it’s time to consider professional help.
Even with the best preparation, certain challenges call for expert intervention.
If you're unsure which tasks you can tackle yourself, Elephant Floors' Sunnyvale showroom offers guidance to help you decide. They’ll help you determine which parts of your project are DIY-friendly and where professional installation can ensure the best results, balancing cost savings with quality.
Getting your DIY flooring project right in Sunnyvale starts with solid planning and a well-thought-out budget. Double-check your measurements, pick materials that match your skill level, and aim to schedule the installation during Sunnyvale's dry summer season. Having all your tools and materials ready to go can help you avoid unnecessary delays and keep things on track.
Remember, your floor is only as good as the subfloor underneath. Make sure the subfloor is in great shape before you move forward. Once that's squared away, ensure your materials have had time to acclimate to the environment, and carefully plan your layout. This step is critical - don’t skip it before opening adhesives or starting installation.
Be honest about your abilities. If you’re dealing with structural issues, moisture concerns, or tricky layouts, it’s worth calling in a professional. For more advanced projects, like nailing solid hardwood or working with intricate tile patterns, hiring an expert can save you time, money, and frustration. A quick self-assessment will help you decide when professional help is the smarter choice.
For personalized guidance, stop by Elephant Floors' Sunnyvale showroom at 950 E El Camino. Their team can help you figure out which parts of your project you can handle yourself and where it might be better to bring in the pros. Bring along your room measurements, photos, and questions to explore material options and even grab some free samples to help you make the best decisions.
Spending a little extra time on preparation can make all the difference. Whether you’re tackling the project solo or teaming up with professionals, proper planning ensures your new floors look great and stand the test of time. A quick trip to the showroom can help you feel confident in your choices, with real-life examples from Sunnyvale homes to guide you.
If you spot any damage or structural problems in your subfloor while prepping for flooring installation, it’s important to take care of them before proceeding. Overlooking these issues can result in uneven floors, instability, or expensive fixes later.
For minor damage, you might be able to patch up small sections. However, more serious issues could require replacing parts of the subfloor entirely. If the structural concerns are significant, it’s a good idea to bring in a professional contractor to ensure the repairs are completed properly and safely. Addressing these problems now will give you a solid and reliable base for your new flooring.
Before installing your flooring, it’s important to let the materials adjust to the room’s environment. Store them in the installation area for 48 to 72 hours beforehand. Make sure the room temperature stays between 65°F and 75°F, and keep the humidity levels within 35% to 55%. This step helps prevent potential issues like warping or gaps once the flooring is in place.
To save money on your DIY flooring project, it’s all about being strategic with your purchases and preparation. Start by keeping an eye out for discounts, seasonal sales, or clearance events - these can be great opportunities to snag materials at a lower price. If you're working with a tight budget, consider options like vinyl or laminate flooring. Both are affordable, durable, and stylish, making them perfect for a cost-effective makeover.
Take on as much of the prep work as you can. Tasks like removing the old flooring, cleaning the subfloor, and accurately measuring the space are things you can handle yourself. Doing so reduces the need for professional services, which can quickly add to your expenses. Be mindful of skipping upgrades or extras that don’t align with your budget - they can easily derail your cost-saving efforts.
With some smart planning and practical choices, you can transform your space with new flooring that looks great and doesn’t strain your wallet.
एक टिप्पणी छोड़ें